
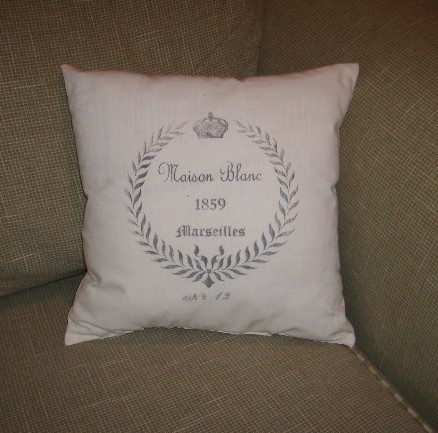
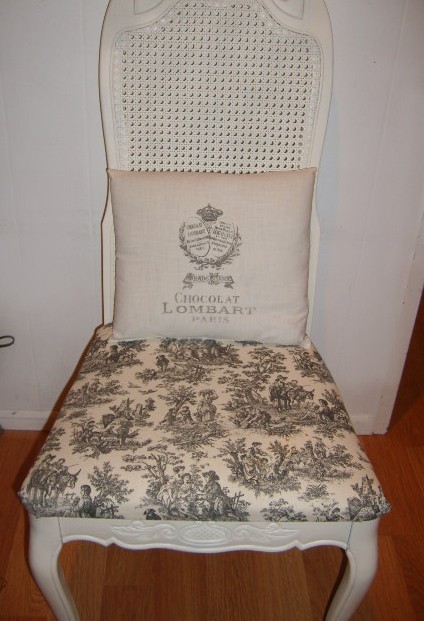
I so love burlap and grain sack pillows. There are so many ideas out there for making your own~ everything from iron on transfers, stenciling and even sending fabric through your printer. The method I am using today uses Citra-Solv and it so amazing!!
I first heard of this method at Ticking and Toile. Shellagh creates the most gorgeous pillows and has a wonderful tutorial on how to she makes the designs.
First you'll need some of this stuff, CitraSolv Natural Degreaser:

I found it in the natural food and products section of Fred Meyer. It is sold all over and if you visit their website here, you can find a store in your area that stocks it. I think it's also available on Amazon.
Next you'll need to make your design on your computer. I love the Graphics Fairy for free vintage clip art. One of my pillows is a wonderful French Chocolate label from her site and the other is my own design.

These are the designs I printed to show you a 'before'. You actually want to print them in reverse image for transferring to your fabric like this:

Now you'll take your designs to Kinko's or somewhere and have them made into laser copies. Inkjet copies will NOT work.
The fabric I am using is a cotton muslin. Be sure to wash and dry your fabric before starting to preshrink and remove sizing. I covered my work surface with a plastic tablecloth to protect the surface. You don't want the full strength CitraSolv to touch your surface.
Place your design facedown on your fabric and tape it in place to keep it from shifting and giving you a blurry transfer. Apply the CitraSolv with a paintbrush or cotton ball. Wear gloves and try not to breathe the fumes, they're a bit strong. As you apply the CitraSolv, you'll see your design show through the paper.

The next step is to burnish. Using a metal spoon, rub firmly all over your design. Be sure to burnish the entire surface. Once you are finished, lift off the paper and your design will have been magically transfered to your fabric.
At this point you'll use your iron to heat set the design. Move it the ironing board and iron for about 20-30 seconds with an old towel underneath. Now you're ready to throw it in the washing machine to remove the CitraSolv, then allow to air dry. When it's dry, iron out the wrinkles and you're ready to stitch up your pillow!
Have a great weekend and I so hope you'll consider becoming a follower! Linking up to the fun parties below!


Hi Renee ~ WOW, these pillows look wonderful! You did a GREAT job on them. Maybe you'll start listing them in your Etsy store ... bet they would be BIG sellers. Must tell you, I don't usually have my speakers on but today they are on and I LOVE your music! I'm sitting here swooning!
ReplyDeletethese are very nice!!
ReplyDeleteSherry
Great tutorial, Renee! The pillow is fabulous!
ReplyDeleteThanks for sharing!
Cheers!
Tina
Renee~~~~
ReplyDeleteThis is fantastic...thanks for the tutorial!! :-)
XO,
Janie
These turned out so great! I have to laugh...I just did 4 pillows using those graphics from The Graphics Fairy, too! I used transfer paper, though. ;)
ReplyDeletehi Renee, great cushion- thanks for sharing those instructions. I'm your linky neighbour at TT at the Shabby chic cottage. I've just signed up to follow your blog! maybe you'd like to follow me back ;) cheers Trish.
ReplyDeleteWonderful tutorial and your pillows look really beautiful!!
ReplyDeleteI made some stenciled pillow too over at Mel's Cabin...http://cabinfever228.blogspot.com/2011/02/pillow-projects-enhance-cabin.html
ReplyDeletePillows covers are so much fun and easy to make and they change the look of a room very cheaply too!
Mel's Cabin visited your post today.
i love pillows, this turned out great. I would love for you to share this at my party on Weds.
ReplyDeletehttp://typeadecorating.blogspot.com/
Hi Renee~ I adore your pillows!! Absolutely charming- you did a wonderful job~ thanks for the tutorial too- I am going to have to try this sometime! Thanks for sharing at Feathered Nest Friday! :)
ReplyDeleteThose are great. I'm your newest follower. I'm having my first link party tomorrow (Monday). It would be great if you could stop by and post your project. http://diyhshp.blogspot.com
ReplyDeleteThat is so cool. I have never heard of citra solve....but I am addicted the Graphics Fairy. :-)Those pillows came out beautifully. I love the chocolate print in particular.
ReplyDeleteI'd love it if you'd link this project up on my Marvelous Mess party!! I'll be picking one project to feature prominently on my sidebar for a week!!
http://tinyurl.com/4k6f29c
lovely! I adore your pillows.
ReplyDeletemegan
craftycpa.blogspot.com
Your pillows turned out darling! I have been wanting to make pillows like this for a while now, but just didn't know how. Thank you for sharing this tutorial. Love your blog. I am your newest follower.
ReplyDeleteGreat tutorial, thanks for the info.
ReplyDeleteWhat a wonderful idea! I absolutely love it and thank you for the instructions.
ReplyDeletegreat tutorial. I never heard of this method. I am now a follower. hope you can hop on by Piorra maison.
ReplyDeleteAu revoir
Caroline
This is an amazing idea! Do you think it will work on things like tea towels (with flower sack cloth, etc)?
ReplyDeleteHi Renee! Thanks so much for entering my giveaway & for posting a button! Love your blog, a great tutorial for making pillows, I'd never heard of the Citra Solv~ thanks for sharing! Looking foward to following you!
ReplyDeletepaula:)
Renee, your pillows look fabulous! I have tried this once and my design bled a lot. I think I used too much Citrasolv. Yours came out perfectly! I think I will have to give it another try :)
ReplyDeleteFabulous pillows...thanks for sharing...:)
ReplyDeletejust purchased a ton of drop cloth to make some of my own....we'll see....
Mariaelena...:)
These are beautiful and your tutorial is great! Thanks for linking up!
ReplyDeleteI love this technique so you don't get that glossy film around an image that you get with iron-on transfer paper. Does the citrus smell come out with one washing? That stuff is pretty potent. Just curious. Thanks for sharing with air your laundry Friday!
ReplyDeleteJami
I'm so happy to find a new way to transfer an image onto fabric. I don't like the rubbery texture or shine of the fabric transfers so this is a great solution. GENIUS! Thanks, Renee
ReplyDeletexo,
Michelle
Great project! Honestly though I got most excited you are from the NW!! I am too and until now all the bloggers I've come across are usually more east coast!
ReplyDeleteso nice of you to share love this. Love your music too! xoLaura
ReplyDeleteOh wow! i gotta do this!!! thanks for sharing the tutorial!! love it!
ReplyDeleteThis is really neat! I'll have to try it! I used some clipart from the Graphics Fairy to make some pillows with French letters on them. I'll have to try this method!
ReplyDeletehttp://www.etsy.com/listing/68891690/mail-from-paris-pillow
so great. your tutorial was very specific. I am now a newest follower. I hope you can join my blog as well.
ReplyDeleteBonne Journée
Caroline
Renee this is BRILLIANT! I have spent the past year searching for a design transfer technique that wasn't and iron on. I think those look horrible and don't hold up to washing. Thank you so much! Please please post this at my party today! I'm following you, you deserve it! FABULOUS job! I would be delighted if you would link this to my party today! http://designergarden.blogspot.com/2011/03/vip-party-6.html
ReplyDeleteSommer @ Designer Garden
I love your pillow! What a great tutorial...I'd never heard of Citra-Solv. I think I'll have to get some and give it a try. I've been enjoying looking around your blog and reading your posts. Thanks for the email....I'm now your newest follower. I'm looking forward to reading more of your posts and seeing your great ideas!
ReplyDeleteI love these... always been a fan of the potato sack looking pillows! great idea. thanks!
ReplyDeleteso cute! I haven't tried this method yet, but I may have to give it a try. Is the citra solv ok for your iron or silverware? Just curious. Thanks for sharing this at Transfomrmations and Treasures!
ReplyDeleteJust did this for the first time, came out great. Thanks.
ReplyDelete